
The Homyachok scrap challenge about spring in a circle was at the back of my mind when I started with this project yesterday. Halfway through my project when I looked again at the challenge requirements, I realized that the challenge had expired and the next one, 'NEST' was on. So I modified a bit and here is the result.
I am so happy and thrilled with the result as it has come out better than I had thought. This is a centerpiece representing a pond with a lotus flower and leaves. The clever duck has made its nest on the edge between some long grass. The mother duck is with three little ducklings that have just hatched with two in the water and one still in the nest. There are broken egg shells in the nest and one whole egg that is ready to hatch any moment! The mother duck is taking its newborn ducklings for a first swim in the pond.


I am linking this project to
- Craft Room - In the garden
- Artistic Inspirations - Challenge 34, Fantasy
- Fussy and Fancy - Spring Days
- Pin and Tack - Spark your creativity
- Creative Craft Challenges 2 - For the kids
- Milk Coffee Challenge - Anything but square
- Unstampabelles Challenges - #22 Anything but a card
- Through the Craft Room Door - April 2-8 TTCRD Challenge
- Homyachok-scrap-challenge : Nest and In a Circle


This time while making the project I took an extra effort to take snaps of the steps. So here is the tutorial of the project. As I was looking at images of real ducklings and ducks, I had to do hit and trial to come up to the correct dimensions for each part.
I have used self cut paper using the hand shredder.
Pond Frame
Blue strips (3 mm) - 40 strips of 30 cm each
Pink strips (3 mm) - 40 strips of 30 cm each
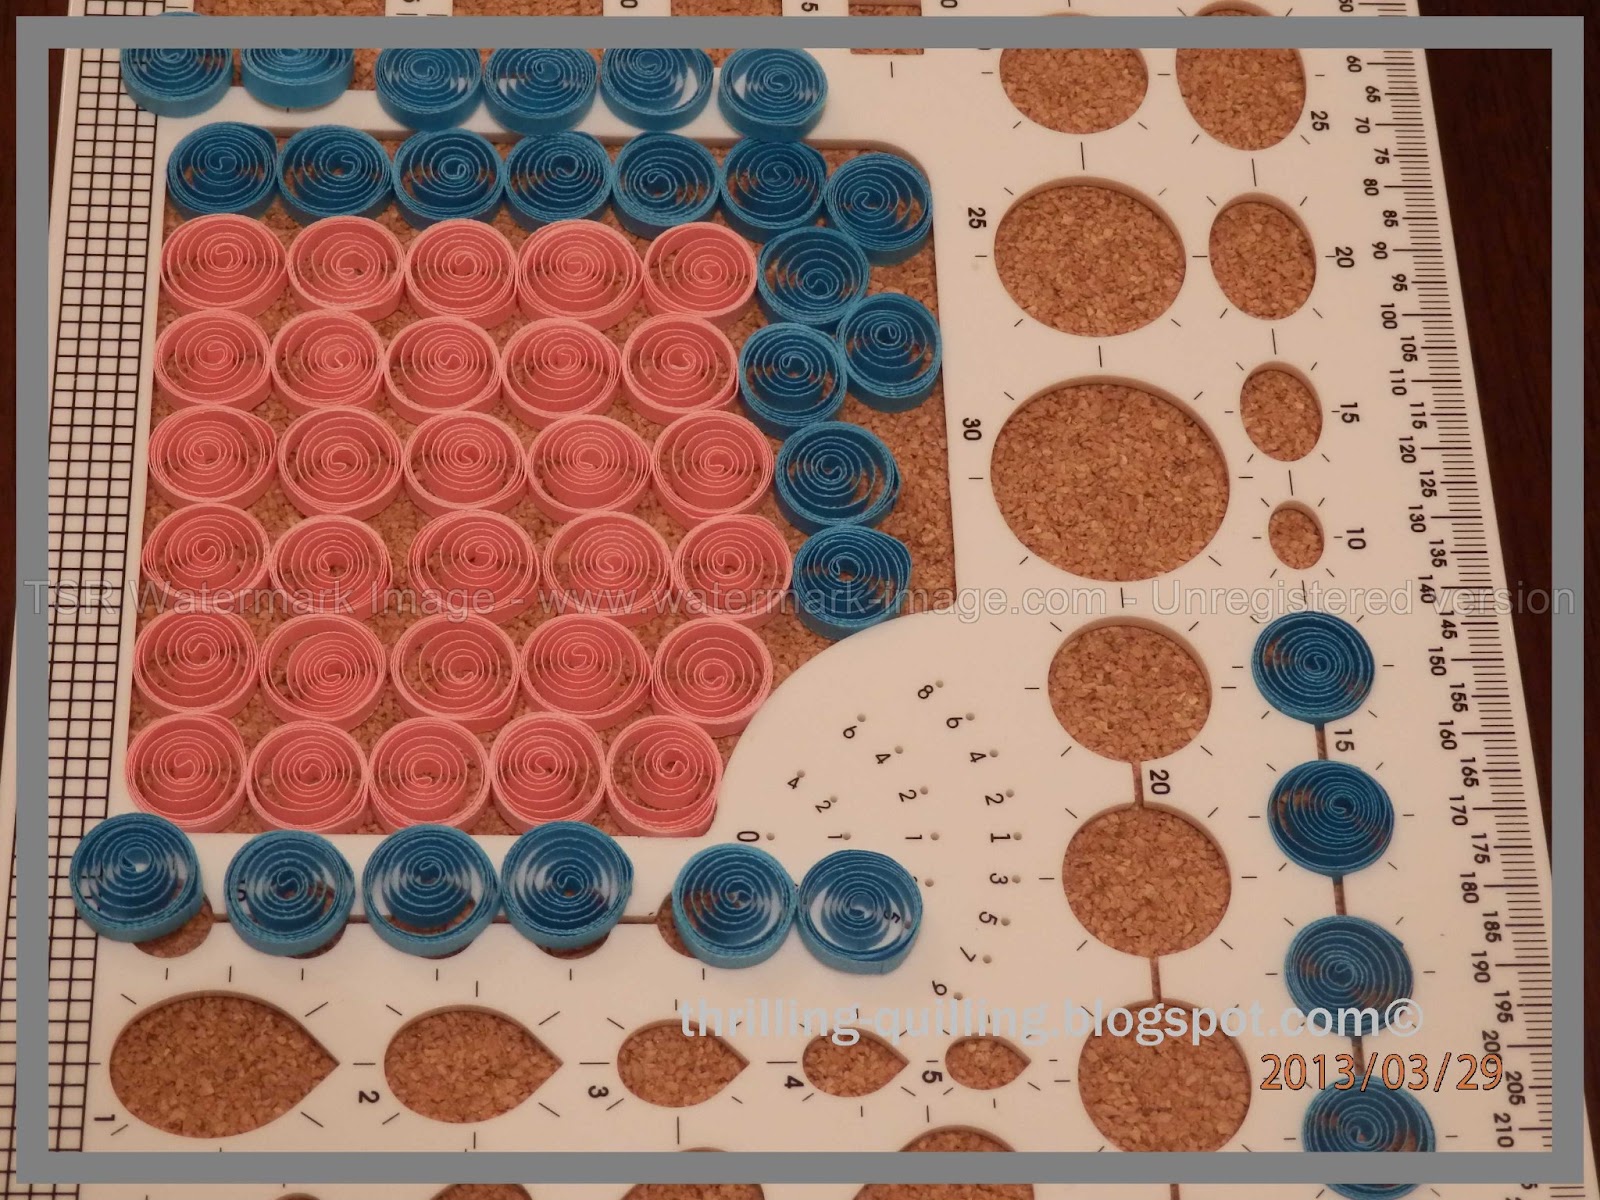
I started with rolling the strips into loose coil. Then I pinched these into teardrops and joined them in a chain. These I then connected and this formed the frame of the pond.


Duckling
Supplies for 1 duckling
Yellow strips (3 mm) - 2 strips of 30 cm each
Yellow strips (1.5 mm) - 2 strips of 15 cm each
Orange strips (1.5 mm) - 2 strips of 8 cm each
Yellow strip (6 mm) - 1 strip of 15 cm, fringed very finely
Small black beads - 2
Start with rolling the yellow strips into tight coils and the orange strip into a slightly loose tight coil (just release the tight coil slightly without letting it loosen out completely)


Now using the 3D dome (or any spherical shape) to shape the tight coils into hemispheres. Do this for one larger yellow coil and 2 smaller yellow coils.

Note that the dome should be smaller than the tight coil. In this picture as the dome C is larger than the tight coil, I have used the smaller dome B as shown in the picture above.

With the remaining larger yellow coil, shape it into a cone using a conical shape as a pencil.

Now push one end of the tip to one side so you get a shape as a horn. Be careful while doing this because it is easy to pull too hard and let the inner coils escape out. If this happens the best is to start again with a new strip.

Always apply glue to the inside surface of any dimensioned shape so that it well keep its shape when the glue dries.

For the beak, shape the orange coils into a heart shape and give it some dimension with your nails.

Join together the 2 bigger pieces (body) and the 2 smaller pieces (head).
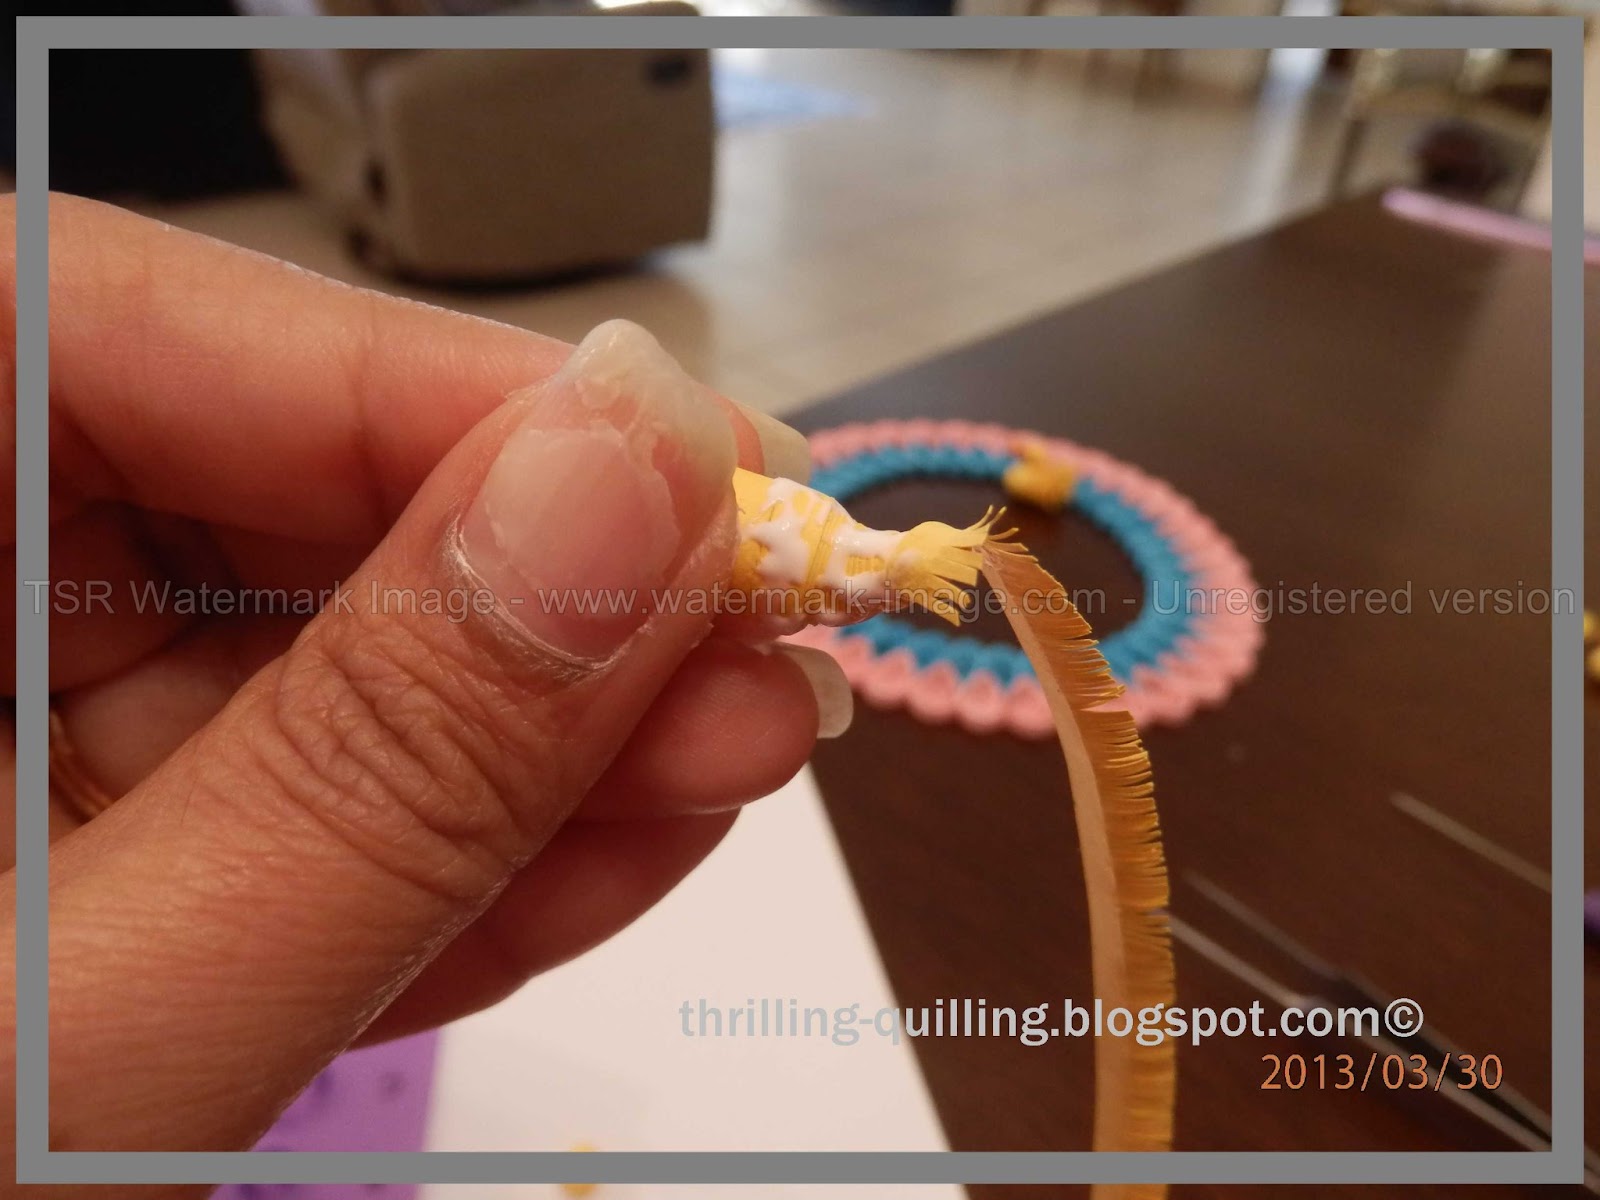
Now start wrapping the fringed tip on the body of the duckling starting from the narrow tip end.

Continue wrapping till the complete piece is covered with the fringed strip.

Now glue together the body, head and the beak. For the beak, first stick together the two heart shaped pieces at the wide end so that the narrower triangular side forms an open beak.

Now glue the beads and the duckling is ready.
Duck
Supplies for the duck
While strip (3 mm) - 1 strip of 150 cm (I joined together 5 strips of 30 cm each)
While strip (7 mm) - 1 strip of 150 cm (I joined together 5 strips of 30 cm each)
While strip (1.5 mm) - 2 strips of 30 cm each
While strip (1.5 mm) - 2 strips of 60 cm each
Orange strips (1.5 mm) - 2 strips of 15 cm each
White strip (3 mm) - 1 strip of 30 cm
Small black beads - 2

Make tight coils with the 2 long (150 cm) strips, the two narrow 30 cm strips and the one 30 cm strip. Make a very loose coil with the two 60 cm strips. Make slightly loose coils with the orange strips and shaping them into heart shape, make the beak as described in the steps for the duckling.
(In the picture here the two larger coils are both of 3 mm width. but I had to later replace one of them with the 7 mm strip)

And this is the reason why! Because the strips were too narrow, I was not able to shape them properly into a conical shape. So I had to start again with a wider strip.

The remaining steps for making the body and the head are the same as that for the duckling. The only difference here is that I inserted a tight coil between the head and the body. For the wings, create shaped teardrops with the 2 loose coils.

And assemble the beak and the wings on the duck like this. Glue on the two black beads for eyes.
Nest
Supplies for the nest and its content
Brown strips - Random size and number
While strips (1.5 mm) - 8 strips of 15 cam each
Yellow strips (3 mm) - 2 strips of 30 cm each
Yellow strip (6 mm) - 1 strip of 10 cm fringed very finely
Orange strips (1.5 mm) - 2 strips of 8 cm each

For creating the nest randomly stick together brown strips on dome shape creating a nest. Create tight coils with the while strips to form the egg halves. Stick two halves to make one egg and let the other halves remain as halves. Shape the yellow strips into tight coils and create domes and stick together forming a ball. Cover it with the fringed strip. Make beaks from the orange strips and glue it to the yellow fringe covered ball. Glue the egg halves, the one full egg and the duckling hatch-ling in one half of the egg randomly in the nest.
Water

For the water effect, cut out a yellow circle that is slightly larger than the inner gap in the frame. I have used a normal office ink pad and sponge to give on water effect on the circle.
Lotus flower and leaves

For the lotus leaves, I created triangles from 1.5 mm green strips and joined them together to make a circle. I also husked a circle but forgot to take any pictures :(

For the lotus flower, I used 1.5 mm pink and while strips. The top two layers are made with 7.5 cm long strips for each petal and the bottom layer is made with 15 cm long strips for each petal. I have made the teardrops by coiling together a pink and white strip to give a shaded effect. A cone is placed inside the top layer petals.
Assembly

I first glued the circular paper (the water body) inside the frame.
To make the duck and ducklings stand erect, I stuck tiny circles under their bodies. The nest is stuck on the border of the pond on the frame. I inserted and glued some green diagonal cut strips on the pink and blue pieces of the frame surrounding the nest. The two tiny ducklings are close to the nest and the mother duck is further away all in swimming in a line. The lotus leaves are on one side of the pond along with the lotus flower.
Hope you enjoyed reading it. I enjoyed making it!
If you find my work inspiring and create something similar, please quote my work and blog in your post. I would also appreciate if you leave a comment. All budding artists do need a pat on the back! Thanks for visiting!

This is so totally gorgeous! Great quilling and that nest... with those hatched eggs...... how cute can you get! And thank you for a generous tutorial.
ReplyDeleteThank you for your kind word! Some days ideas just sprout like the spring lilies!
ReplyDeleteHi Nupur,
DeleteSame blog has a quilling challenge, where the design has to be round and contain yellow & green colours (but you can have other colours too). Your work well and truly qualifies. Here's the URL, and they translated the requirements into English as well:
http://homyachok-scrap-challenge.blogspot.com/2013/03/v-kruge.html
Thanks for your valuable comment Zoe! That was very kind and thoughtful of you. I have now linked my entry to this challenge too!
DeleteFabulous quilling project! Thanks for joining at Creative Craft Challenges: For The Kids
ReplyDeleteHugs
Dewi
Thanks for your kind words Dewi! It is my pleasure being part of your challenge!
DeleteThis is amazing - I love it. I use to do quilling years ago but I never did anything a beautiful as this.
ReplyDeleteThank you for visiting my blog.
xxx Hazel.
Thanks for your kind words Hazel. Your work today is so beautiful and looks extremely professional! Keep on inspiring!
DeleteIt is so amazing! I see there a lot of work ;)
ReplyDeleteAppreciate your kind words!
Deletesensational beautiful work you are so very talented. Thank you for sharing with us at Craft-Room Challenge XOXO Zoe
ReplyDeleteThanks Zoe for your kind words! Appreciate them! Its my pleasure being a part of your challenge at Craft Room. Thanks for providing a challenge to crafter's creativity!
DeleteVery cute! Love this creation! Duck and ducklings are awesomely lovely! So gentle and so detailed! Love the nest too. So many details, so interesting. Thanks you for joinging us at Homyachok challenge blog! But please, read the rules, and add banners of the challenges you're in to this post. Thanks for sharing and for tutorials too ;) Good luck!
ReplyDeleteThanks for your kind words! As this was my first time participating in the challenge, I was not aware of the rules. Thanks for informing me! I have now added the banners to the post. Hope this is OK now.
Deletevery cute!!! thanks for sharing!!
ReplyDeleteThanks for you kind words Nati.
Deleteso lovely work!! Congrats! I love it!
ReplyDeleteCristina
Thanks Cristina, your work is so detailed and beautiful that it is an honour receiving appreciation from you.
DeleteThis is a lovely project, Nurpur, and a great tutorial too! Thanks also for your kind comment on my blog. Have you considered joining the Quilling Guild ( www.quilling-guild.co.uk )? Yours are just the kind of projects I will be looking to publish when I take over as editor of the magazine.
ReplyDeletePhilippa
Thanks for your appreciation! It means a lot coming from you! I would love to join the quilling guild and will look into it right away.
DeleteThat would be great if you would like to join the Guild, Nurpur! Please mail me at quilliancemail@gmail.com if you have any questions
DeleteOoh my word such a lot of details and alot of thought, Just absolutely beautiful. Thank you for the tutorial. Thank you for joining us at Artistic this week. Abbie (Owner) xx
ReplyDeleteThanks a lot for your kind words! And it is my pleasure being a pert of your challenge! Challenges always provide inspiration and motivation!
DeleteFabulous crafting Nupur! Lovely tutorial, never have tried this guilling, looks great.
ReplyDeleteThanks for visiting my blog too!
Thank you for sharing your cration at Craft-Room Challenge, welcome again;-))m
Thanks for your appreciation! It is my pleasure being a part of your challenge!
Deletethis is Super!!! thanks for sharing with us at Craft Room Challenge, Debi x
ReplyDeleteThanks Debi, it is my pleasure being part of your challenge!
DeleteWOW this one is a fantastic project and it is so exciting when a talented artist such as yourself shares a tutorial. The duck especially is fabulous.
ReplyDeleteThanks for your kind words Sonia! It means a lot coming from a talented crafter as yourself!
DeleteWow, I am speechless. Love love the interpretation of the story here. So well executed and thank you so much for sharing the tutorial. It is really helpful for someone like me who is new to quilling.
ReplyDeleteThanks a lot for your words of appreciation!
DeleteThis is stunning work! Thanks for entering at the Craft Room and for visiting my blog!
ReplyDeleteThanks a lot for your kind words!
Deletethis is a lovely project and thanx for the tute Nupur!!
ReplyDeleteThanks Suman!
DeleteAmazing work! Goog luck!!!!
ReplyDeleteThanks Nathalie
DeleteAmazing work love your tutorial,you are so talented.
ReplyDeleteThanks for your kind words Merry!
DeleteWow! gr8 quilling. Loved it and thanks for the tutorial. Thanks so much for joining at 'For the love of crafting'. Good luck!
ReplyDeleteThanks for you kind words and wishes!
DeleteOh my goodness! this is so totally amazing, beautifully thought out and executed. Thank you for sharing how you did this and entering our challenge at Unstampabelles, Anything BUT a card.
ReplyDeleteThanks for your appreciation! Some days inspiration just comes as a bulb lighting up. Execution after that becomes easy. It is my pleasure to be part of the challenge at Unstampabelles!
DeleteYour projekt is amazing!Duck and ducklings look cute!
ReplyDeleteThanks for visiting my blog too!
Hi Nupur, I am glad you have shared this with us at Unstampabelles. So much work and thought has gone into this creation. Thanks for joining in our Anything but a Card challenge this month.
ReplyDeletebeautiful projects and happy to follow you
ReplyDeleteSuch a beautiful pond. I am actually wondering about the way you have made the frame must try it out,Thanks for the steps too. Amazing really!!
ReplyDeleteThanks for your kind words Suganthi. Actually I had started making the frame with an entirely different idea, but because of the different tensions in the paper of the two colours, the ring was slightly concave when standing and playing with it I flattened it into a circle. That gave me the idea of converting it in a pond and create something for the Homyachok challenge.
DeleteVery cute pond and I love the way you made the fluffy ducklings! I know it took lots of hours to make and then to share too. Thanks for visiting All Things Paper.
ReplyDeleteThanks for your kind words!
DeleteLovely creation!
ReplyDeleteVery beautiful... & a nice tutorial ...Thank you for joining us at 'For the love of crafting'.
ReplyDeletewow such a stunning creation, so much work and effort must have gone into this. Thanks for joining us this challenge at Milkcoffee xx
ReplyDeleteOh WOW this is totally stunning and must have taken hours of work :-)
ReplyDeleteThanks for joining us over at Fussy and Fancy for our "Spring Days" challenge - good luck!
xx Sazzle xx
Thanks for all your kind words!
ReplyDeletewow amazing swetie well done!and awesome tutorial too!!Thanks for joining us at Creative Craft Challenges!!
ReplyDeletehugs
xMx
you can visit
http://whenthescraphitsthefun.blogspot.com/
and http://colorinkdigistamps.blogspot.gr/
for my free digis!!
This is wonderful! thank you for such a great tutorial as well ;-) thanks for joining in with UnstampaBelles Challenge this month.
ReplyDeleteWow ! This is so beautiful! Thanks for the tutorial !
ReplyDeletewow ! pond scene is awesome with cute ducks and boat
ReplyDeletethanks for the tutorial !
Fun project....very cute!
ReplyDeleteThanks so much for sharing this beautiful creation with us at 'For the love of crafting'
Hi Nupur,
ReplyDeleteWell done to us - our creations were noted as special by the judges :)
Really nice and somethin different.....
ReplyDeletehappyexperimenting.blogspot.com
Dear Nupur,
ReplyDeleteI want to thank you for your appreciation of my work! I'm very pleased and very important to me! I have previously seen your work and I am a reader of your blog - you have a very interesting and unusual work. These ducks - a very novel solution. Interesting and detailed master class! Thanks for looking my blog. You are always welcome! With respect Irina Zelenskaya))) (sorry for my english)
Oh wow!! What an amazing scene! I cannot even imagine the time and work that must have gone into this. Really, really beautiful. Great job and thanks for playing at the UnstampaBelles Challenge!!
ReplyDeleteAmazing quilling!
ReplyDeleteCongrats and greetings from Chile
www.creaquilling.blogspot.com
Ohh, beautiful! I really like this ❤️
ReplyDelete